Fy.L 的个人博客

自学尚未成才的码农0=0


  • 首页

  • 关于

  • 标签

  • 分类

  • 归档

  • 日程表

  • 站点地图

  • 公益404

  • 搜索

Java连接MySQL问题记录

发表于 2019-01-10 | 分类于 MySQL |
字数统计: 725 字 | 阅读时长 ≈ 3分钟

最近学习Java服务器开发,需要用到MySQL数据库连接,在此记录一下遇到的问题及解决方案。


##连接MySQL
按照RUNOOB.COM的教程,连接MySQL数据库,Java代码为:

1
2
3
4
5
6
7
8
9
10
11
12
13
14
15
16
17
18
19
20
21
22
23
24
25
26
27
28
29
30
31
32
33
34
35
36
37
38
39
40
41
42
43
44
45
46
47
48
49
50
51
52
53
54
55
56
57
58
59
60
61
62
63
64
65
public class MySQLDemo { 
// JDBC 驱动名及数据库 URL
static final String JDBC_DRIVER = "com.mysql.jdbc.Driver";
static final String DB_URL = "jdbc:mysql://localhost:3306/RUNOOB";

// 数据库的用户名与密码,需要根据自己的设置
static final String USER = "root";
static final String PASS = "123456";

public static void connectTest() {
Connection conn = null;
Statement stmt = null;
try{
// 注册 JDBC 驱动
Class.forName(JDBC_DRIVER);

// 打开链接
System.out.println("连接数据库...");
conn = DriverManager.getConnection(DB_URL,USER,PASS);

// 执行查询
System.out.println(" 实例化Statement对象...");
stmt = conn.createStatement();
String sql;
sql = "SELECT id, name, url FROM websites";
ResultSet rs = stmt.executeQuery(sql);

// 展开结果集数据库
while(rs.next()){
// 通过字段检索
int id = rs.getInt("id");
String name = rs.getString("name");
String url = rs.getString("url");

// 输出数据
System.out.print("ID: " + id);
System.out.print(", 站点名称: " + name);
System.out.print(", 站点 URL: " + url);
System.out.print("\n");
}
// 完成后关闭
rs.close();
stmt.close();
conn.close();
}catch(SQLException se){
// 处理 JDBC 错误
se.printStackTrace();
}catch(Exception e){
// 处理 Class.forName 错误
e.printStackTrace();
}finally{
// 关闭资源
try{
if(stmt!=null) stmt.close();
}catch(SQLException se2){
}// 什么都不做
try{
if(conn!=null) conn.close();
}catch(SQLException se){
se.printStackTrace();
}
}
System.out.println("Goodbye!");
}
}

没想到直接运行马上马上就报错了。


###错误一:Could not create connection to database server - java mysql connector
此问题是由于RUNOOB.COM提供的Jar包过期导致无法连接最新版MySQL数据库。

####【解决方法】
下载最新版的Jar包
密码: igvz
并将代码中的驱动修改一下:

1
2
// JDBC 驱动名及数据库 URL
static final String JDBC_DRIVER = "com.mysql.cj.jdbc.Driver";

###错误二:java.lang.ClassNotFoundException: com.mysql.jdbc.Driver
解决了错误一后,接着来了错误二,报错代码为:

1
2
// 注册 JDBC 驱动
Class.forName(JDBC_DRIVER);

此问题是由于tomcat找不到MYSQL JAR包导致的。

####【解决方法】
将上一步下载的mysql-connector-java-8.0.11.jar文件拷贝到tomcat根目录下的lib文件夹中。

###错误三:java.sql.SQLException: The server time zone value ‘???ú±ê×??±??’ is unrecognized or represents more than one time zone. You must configure either the server or JDBC driver (via the serverTimezone configuration property) to use a more specifc time zone value if you want to utilize time zone support.
按照错误信息中的提示,在数据库连接字符串中添加serverTimezone=UTC即可解决。

1
static final String DB_URL = "jdbc:mysql://localhost:3306/RUNOOB?serverTimezone=UTC";

###警告四:WARN: Establishing SSL connection without server’s identity verification is not recommended.
输出控制台一直有这个警告,这是由于MySQL要求服务器有SSL验证。

####【解决方法】
继续修改数据库连接字符串,添加useSSL=false参数:

1
static final String DB_URL = "jdbc:mysql://localhost:3306/RUNOOB?useSSL=false&serverTimezone=UTC";

SQLyog连接数据库报错:Plugin caching_sha2_password could not be loaded

发表于 2019-01-10 | 分类于 MySQL |
字数统计: 103 字 | 阅读时长 ≈ 1分钟

##【错误信息】
用SQLyog连接MySQL数据库时,第一次连接会报错如下图:
错误信息

##【解决方法】

###1.打开cmd登录数据库

1
mysql -u root -p

###2.进入mysql依次执行如下命令
`bat

#修改加密规则
ALTER USER ‘root‘@’localhost’ IDENTIFIED BY ‘password’ PASSWORD EXPIRE NEVER;

#更新用户的密码
ALTER USER ‘root‘@’localhost’ IDENTIFIED WITH mysql_native_password BY ‘password’;

#刷新权限
FLUSH PRIVILEGES;

#重置密码
ALTER USER ‘root‘@’localhost’ IDENTIFIED BY ‘your_password’;

CMD命令提示符改编编码命令

发表于 2019-01-10 | 分类于 Windows |
字数统计: 88 字 | 阅读时长 ≈ 1分钟

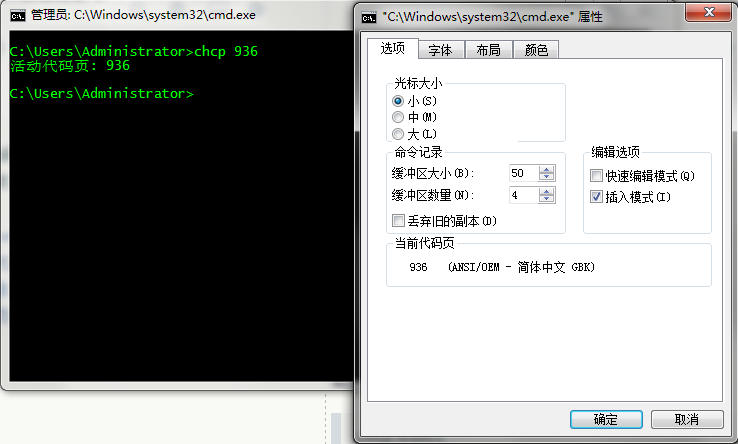
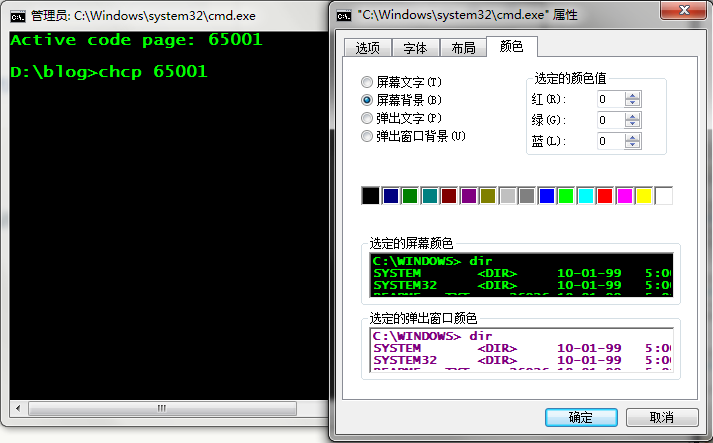
CMD中修改字符编码的命令为 chcp,以下为帮助文档:

1
2
C:\Windows\system32>help chcp 显示或设置活动代码页编号。 CHCP [nnn]   nnn
指定代码页编号。 不带参数键入 CHCP 以显示活动代码页编号。

输入:

1
>chcp 65001

设置编码为UTF-8
UTG-8

输入:

1
chcp 936

设置编码GBK

GBK

树莓派安装KodExplorer变身私人云桌面

发表于 2019-01-09 | 分类于 树莓派 |
字数统计: 1,114 字 | 阅读时长 ≈ 5分钟

标签(空格分隔): 树莓派 KodExplorer


【参考链接】
旧手机安装KodExplorer可道云变身云桌面
Ubuntu14.04下配置PHP7.0+Apache2+Mysql5.7
ubuntu下使用 apt-get install 安装php扩展库mcrypt、curl、gd

本文主要目的是在树莓派上搭建Apache2 + php7.0 环境,并安装KodCLoud实现私人云。因KodExplorer不需要Mysql环境, 所以暂不安装。

【更新软件源仓库】

1
2
sudo apt-get update
sudo apt-get upgrade

【安装Apache2】

  • 安装apache2
    在树莓派上的终端执行如下命令,
    1
    sudo apt-get install -y apache2

编辑apache主配置文件/etc/apache2/apache2.conf,修改KeepAlive设置

1
KeepAlive Off

Apache默认的multi-processing模块(MPM ) 是一个event 模块,但是 php默认是使用 prefork模块,禁用event模块,启用prefork模块

1
2
sudo a2dismod mpm_event
sudo a2enmod mpm_prefork

重启Apache

1
sudo service apache2 restart

  • 修改端口
    进入/etc/apache2/目录下,修改ports.conf文件,添加Listen 端口号即可监听对应端口:
    1
    2
    cd /etc/apache2/
    sudo nano ports.conf

添加内容,每行一条记录:

1
2
3
4
5
6
7
8
# If you just change the port or add more ports here, you will likely also
# have to change the VirtualHost statement in
# /etc/apache2/sites-enabled/000-default.conf

Listen 80
Listen 8000

...其他内容..

同时,按照文件头部的说明,还要修改/etc/apache2/sites-enabled/000-default.conf文件中的VirtualHost声明

1
2
cd /etc/apache2/sites-enabled/
sudo nano 000-default.conf

在VirtualHost *:80>节点修改端口号即可:

1
2
3
<VirtualHost *:8000>
**其他内容**
</VirtualHost>

【安装PHP7.0】
如果系统是jessie,需要假如stretch源才能安装php7,速度相比php5快一倍:

1
sudo vim /etc/apt/sources.list

添加一行:

1
deb http://mirrordirector.raspbian.org/raspbian/ stretch main contrib non-free rpi

接着创建一个文件

1
sudo vi /etc/apt/preferences

添加以下内容

1
2
3
Package: *
Pin: release n=jessie
Pin-Priority: 600

更新源并安装php7.0

1
2
sudo apt-get update
sudo apt-get install -t stretch php7.0 php7.0-curl php7.0-gd php7.0-fpm php7.0-cli php7.0-opcache php7.0-mbstring php7.0-xml php7.0-zip

安装好之后执行 php -v 可以查看版本。

如果这一步出现公钥问题,参照另一篇文章:
https://www.jianshu.com/p/8a1921413fad
即可解决问题。

【LAMP】

  • 整合PHP和Apache2
    1
    2
    sudo apt-get install libapache2-mod-php7.0
    sudo service apache2 restart

【验证环境】

  • 显示PHP的版本信息

    1
    php -v
  • Apache默认的网站根目录位于/var/www/html/,进入这个目录,并创建info.php

    1
    sudo nano /var/www/html/info.php

写入如下内容:

1
2
3
<?php
phpinfo();
?>

在浏览器中输入http://localhost/info.php进行验证。
【KodExplorer】
按照 https://kodcloud.com/download/ 页面的说明,下载KodExplorer并安装:

1
2
3
4
cd /var/www/html/
wget http://static.kodcloud.com/update/download/kodexplorer4.25.zip
unzip kodexplorer4.25.zip
chmod -Rf 777 ./*

最后在浏览器输入http://localhost:8000/index.php,如果一切正常即可看到网盘页面。
【内网穿透】
这一部分不是重点,所以简单介绍一种方法来实现远程访问。
从 https://ngrok.com/download 页面下载ngrok,树莓派选择Linux(ARM)版本进行下载。
或者从这里下载并上传到树莓派:https://bin.equinox.io/c/4VmDzA7iaHb/ngrok-stable-linux-arm.zip

1
2
3
4
cd /home/pi/Desktop/
wget https://bin.equinox.io/c/4VmDzA7iaHb/ngrok-stable-linux-arm.zip
sudo unzip ngrok-stable-linux-arm.zip
sudo ./ngrok http 80 #这里演示的是80端口,其他端口未测试。

然后在Forwarding后面跟着的ip:ports -> localhost:80即为远程映射地址。
在任意浏览器输入上面的ip:ports即可访问到本地服务。

【安装Mysql5.7】

  • 因为Ubuntu14.04下没有Mysql5.7的源,需要连接外部资源库进行下载

    1
    2
    3
    4
    5
    wget http://dev.mysql.com/get/mysql-apt-config_0.6.0-1_all.deb
    sudo dpkg -i mysql-apt-config_0.6.0-1_all.deb
    sudo apt-get update
    sudo apt-get install mysql-server
    # 在安装过程中要输入root的密码
  • 安装完成后,执行mysql_secure_installation,根据提示完成安全设置

    这一步骤中,在手机上用linux deploy部署linux执行有可能出现错误
    W: GPG error: http://rep.mysql.com/apt/debian jessie InRelease: The following signatures were invalid: KEYEXPIRED 1487236823 KEYEXPIRED 1487236823 KEYEXPIRED 1487236823
    w: The repository ‘http://repo.mysql.com/apt/debian jessie InRelease’ is not signed.
    按照https://askubuntu.com/questions/131601/gpg-error-release-the-following-signatures-were-invalid-badsig中的方法:

    1
    2
    3
    4
    5
    6
    > sudo apt-get clean
    > sudo mv /var/lib/apt/lists /tmp
    > sudo mkdir -p /var/lib/apt/lists/partial #这一句可以不执行,update的时候会自动执行
    > sudo apt-get clean
    > sudo apt-get update
    >

依次执行上面的命令后即可重新安装其他版本的mysql。

Raspbian 中国软件源

发表于 2019-01-09 | 分类于 树莓派 |
字数统计: 537 字 | 阅读时长 ≈ 2分钟

标签: 树莓派


本文来自:树莓派实验室
链接地址:http://shumeipai.nxez.com/2013/08/31/raspbian-chinese-software-source.html

花了些时间整理了目前最新的树莓派中国大陆地区的软件源,记下来,希望对大家有帮助。

中国科学技术大学
Raspbian http://mirrors.ustc.edu.cn/raspbian/raspbian/

阿里云
Raspbian http://mirrors.aliyun.com/raspbian/raspbian/

清华大学
Raspbian http://mirrors.tuna.tsinghua.edu.cn/raspbian/raspbian/

华中科技大学
Raspbian http://mirrors.hustunique.com/raspbian/raspbian/
Arch Linux ARM http://mirrors.hustunique.com/archlinuxarm/

华南农业大学(华南用户)
Raspbian http://mirrors.scau.edu.cn/raspbian/

大连东软信息学院源(北方用户)
Raspbian http://mirrors.neusoft.edu.cn/raspbian/raspbian/

重庆大学源(中西部用户)
Raspbian http://mirrors.cqu.edu.cn/Raspbian/raspbian/

中山大学 已跳转至中国科学技术大学源
Raspbian http://mirror.sysu.edu.cn/raspbian/raspbian/

新加坡国立大学
Raspbian http://mirror.nus.edu.sg/raspbian/raspbian

牛津大学
Raspbian http://mirror.ox.ac.uk/sites/archive.raspbian.org/archive/raspbian/

韩国KAIST大学
Raspbian http://ftp.kaist.ac.kr/raspbian/raspbian/

使用说明
编辑/etc/apt/sources.list 文件,参考如下命令:
sudo nano /etc/apt/sources.list
删除原文件所有内容,jessie 用以下内容取代:

1
2
deb http://mirror.sysu.edu.cn/raspbian/raspbian/ jessie main contrib non-free
deb-src http://mirror.sysu.edu.cn/raspbian/raspbian/ jessie main contrib non-free

wheezy 用以下内容取代:

1
2
deb http://mirror.sysu.edu.cn/raspbian/raspbian/ wheezy main contrib non-free
deb-src http://mirror.sysu.edu.cn/raspbian/raspbian/ wheezy main contrib non-free

注:网址末尾的raspbian重复两次是必须的。因为Raspbian的仓库中除了APT软件源还包含其他代码。APT软件源不在仓库的根目录,而在raspbian/子目录下。

编辑镜像站后,请使用sudo apt-get update命令,更新软件源列表,同时检查您的编辑是否正确。
如果需要, 你可以执行以下命令将Raspbian public key加入你的 apt-get keyring :

1
wget http://archive.raspbian.org/raspbian.public.key -O - | sudo apt-key add -

2015.11.23 add a update from comments:
现在版本升级了,版本号要更改,把 wheezy 改成 jessie > 这样大部分源是在中国,不然像楼上那样升级,大部分源在国外

【转载】Linux启动项管理:Update-rc.d 命令用法详解

发表于 2019-01-09 | 分类于 Linux |
字数统计: 581 字 | 阅读时长 ≈ 2分钟

标签: Linux Update-rc.d


[原文链接:Update-rc.d 命令用法详解]
[原文作者:Shb_derek]

Ubuntu或者Debian系统中update-rc.d命令,是用来更新系统启动项的脚本。这些脚本的链接位于/etc/rcN.d/目录,对应脚本位于/etc/init.d/目录。在了解update-rc.d命令之前,你需要知道的是有关Linux 系统主要启动步骤,以及Ubuntu中运行级别的知识。

一、Linux 系统主要启动步骤
读取 MBR 的信息,启动 Boot Manager。
加载系统内核,启动 init 进程, init 进程是 Linux 的根进程,所有的系统进程都是它的子进程。
init 进程读取 /etc/inittab 文件中的信息,并进入预设的运行级别。通常情况下 /etc/rcS.d/ 目录下的启动脚本首先被执行,然后是/etc/rcN.d/ 目录。
根据 /etc/rcS.d/ 文件夹中对应的脚本启动 Xwindow 服务器 xorg,Xwindow 为 Linux 下的图形用户界面系统。
启动登录管理器,等待用户登录。

二、运行级别
Ubuntu中的运行级别

0(关闭系统)
1(单用户模式,只允许root用户对系统进行维护。)
2 到 5(多用户模式,其中3为字符界面,5为图形界面。)
6(重启系统)

切换运行级别

1
2
init [0123456Ss]
例如:init 0 命令关机; init 6 命令重新启动

启动项管理工具

1
2
sudo install sysv-rc-conf //或者使用带gui的工具bum
sudo sysv-rc-conf

三、update-rc.d命令详解

从所有的运行级别中删除指定启动项

1
update-rc.d -f <basename> remove

按指定顺序、在指定运行级别中启动或关闭

1
update-rc.d <basename> start|stop <order> <runlevels>

实例:update-rc.d apachectl start 20 2 3 4 5 . stop 20 0 1 6 .

解析:表示在2、3、4、5这五个运行级别中,由小到大,第20个开始运行apachectl;在 0 1 6这3个运行级别中,第20个关闭apachectl。这是合并起来的写法,注意它有2个点号,效果等于下面方法:

1
update-rc.d apachectl defaults

A启动后B才能启动,B关闭后A才关闭

1
2
update-rc.d A defaults 80 20
update-rc.d B defaults 90 10

启动和关闭顺序为90,级别默认

1
update-rc.d <basename> defaults 90

树莓派:实现物联网第一步之控制LED

发表于 2019-01-09 | 分类于 树莓派 |
字数统计: 751 字 | 阅读时长 ≈ 4分钟

硬件部分

准备材料:

  • 树莓派
  • 面包板(可选)
  • 杜邦线(可选)
  • LED
  • 继电器

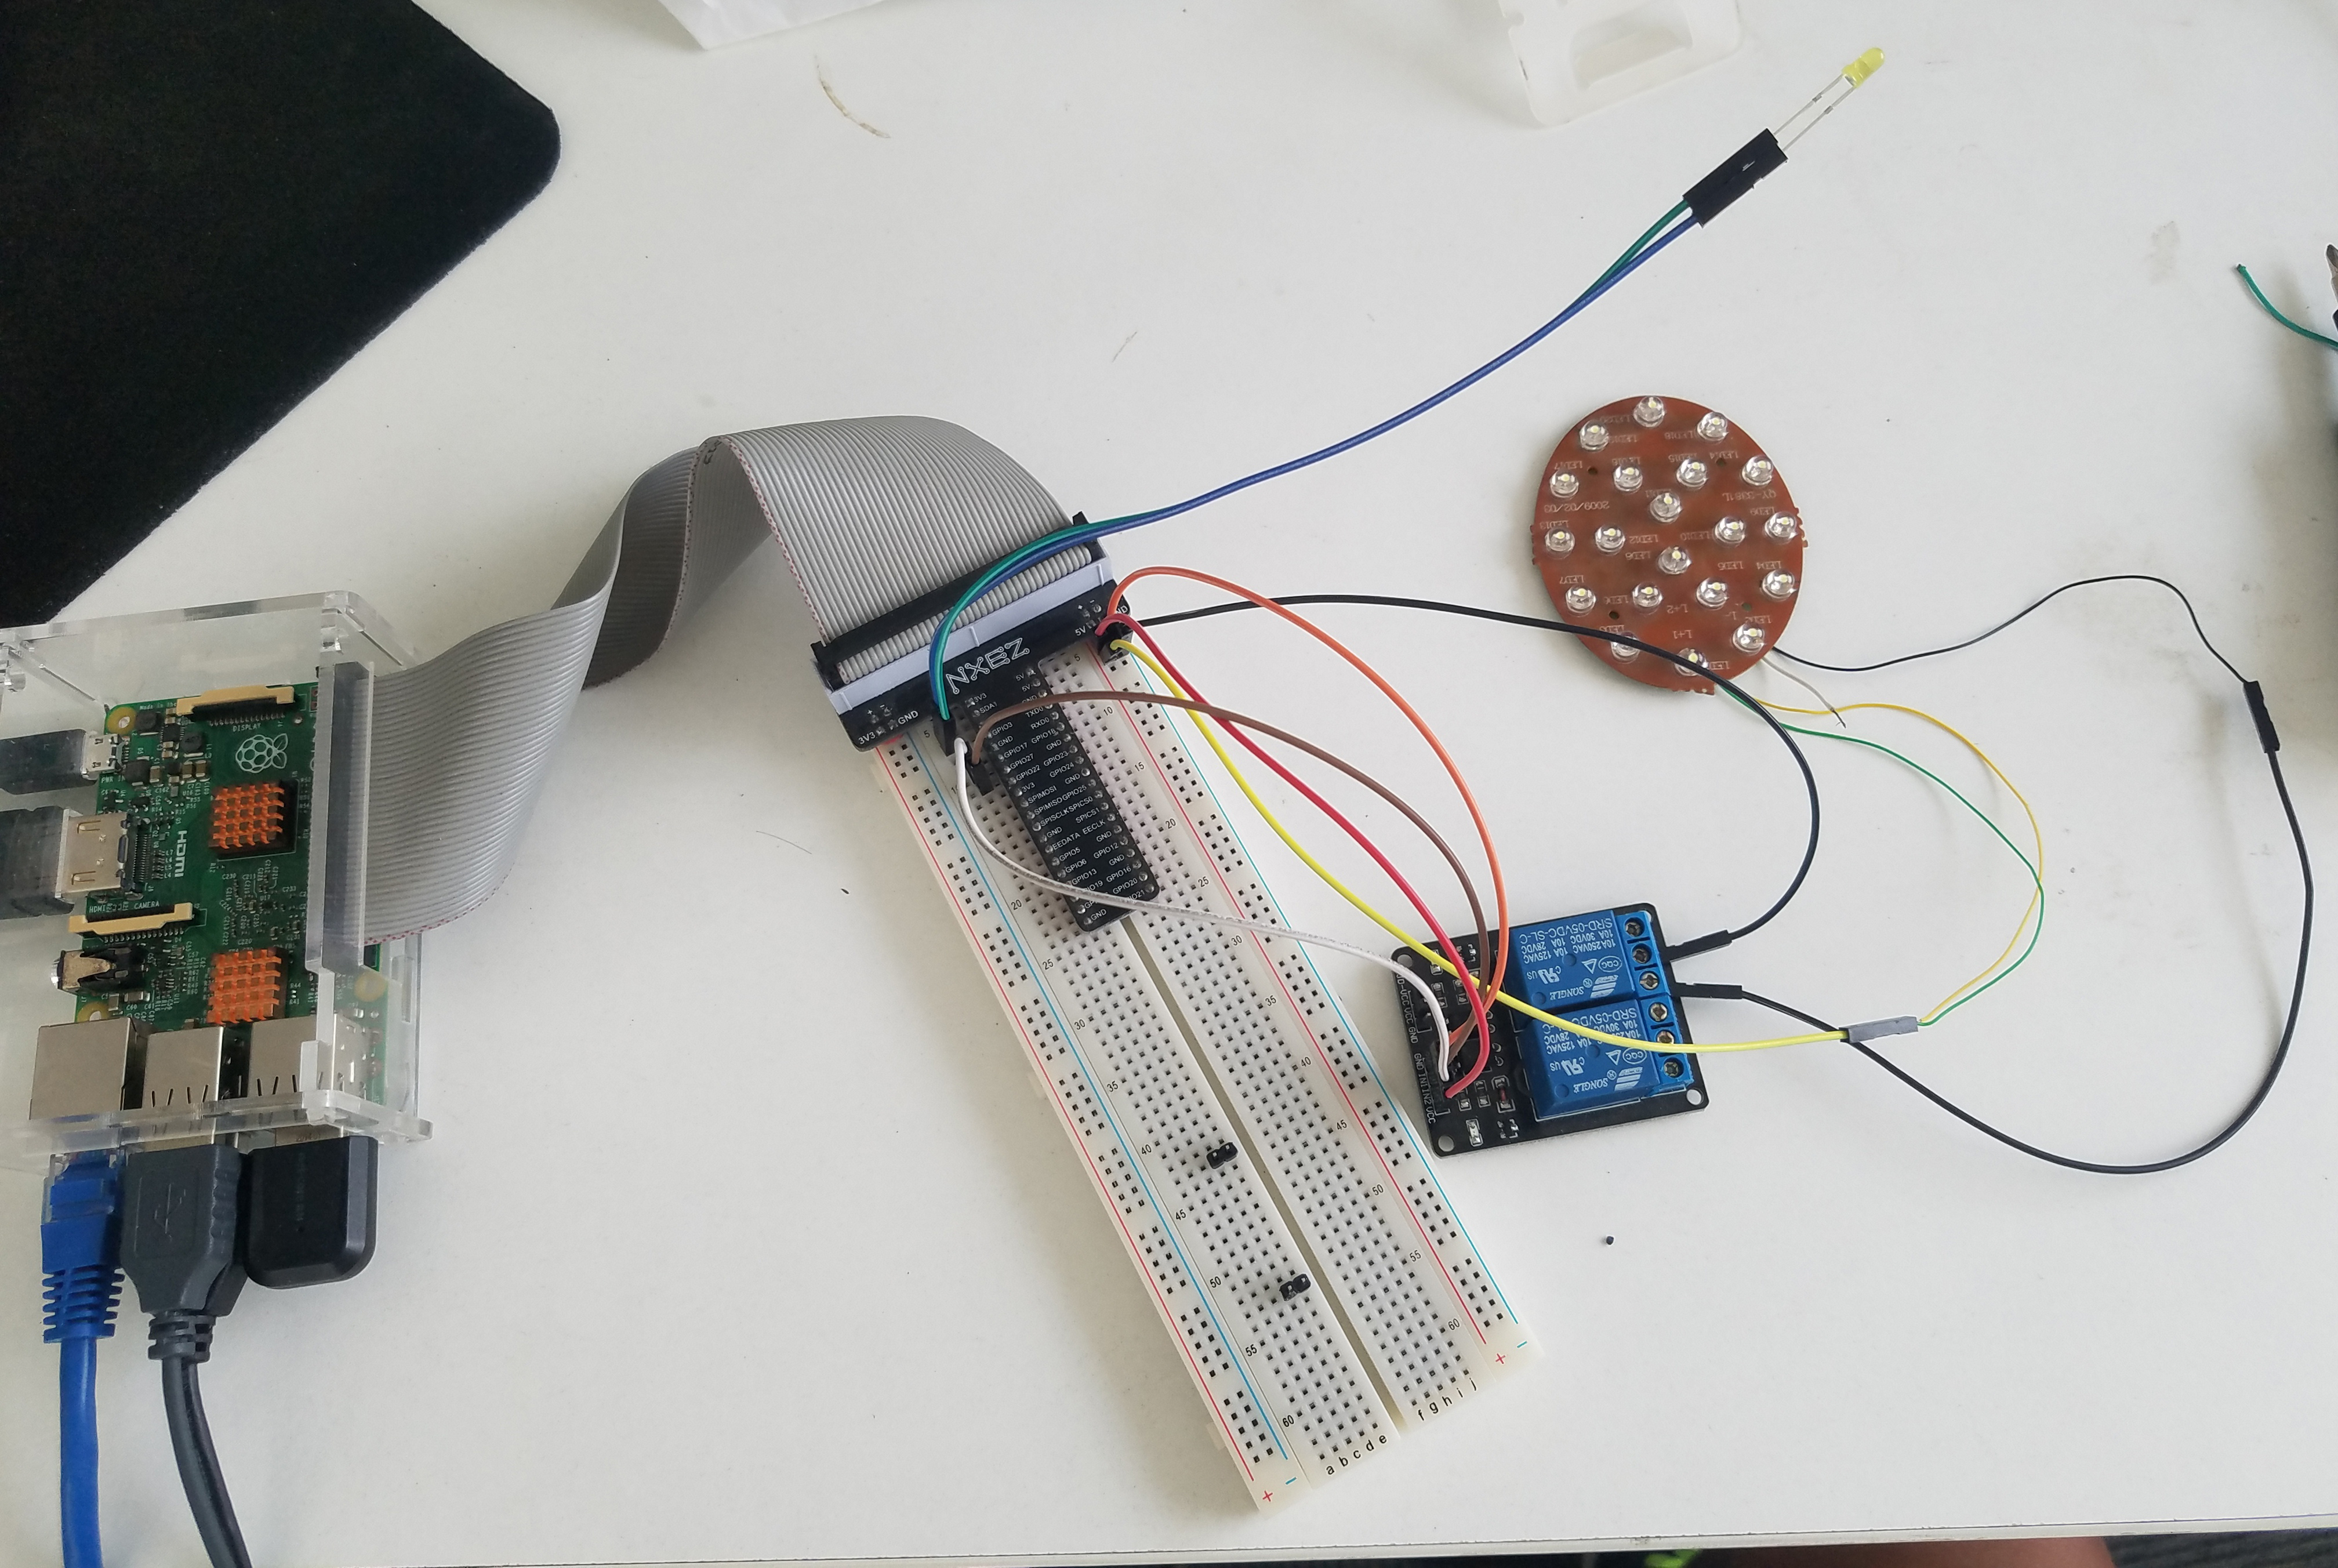
LED、继电器等连接到面包板上,继电器连接到树莓派的GPIO11和GPIO13,LED连接到继电器,具体链接方法不再详述;
硬件连接

  1. 安装FLask(Flask安装教程)
  2. 创建led.py,相同目录下创建templates文件夹,里面放一个led.html,代码分别如下:
    1
    2
    3
    4
    5
    6
    7
    8
    9
    10
    11
    12
    13
    14
    15
    16
    17
    18
    19
    20
    21
    22
    23
    24
    25
    26
    27
    28
    29
    30
    31
    32
    33
    34
    35
    36
    37
    38
    39
    40
    41
    42
    43
    44
    45
    46
    47
    48
    49
    50
    51
    52
    53
    54
    55
    56
    57
    58
    59
    60
    61
    62
    63
    64
    65
    66
    67
    from flask import Flask, render_template , request
    import RPi.GPIO as GPIO
    import time

    GPIO.setmode(GPIO.BOARD)
    GPIO.setup(11, GPIO.OUT)
    GPIO.setup(13, GPIO.OUT)
    GPIO.setup(3, GPIO.OUT)
    GPIO.setup(5, GPIO.OUT)

    GPIO.output(11, GPIO.HIGH)
    GPIO.output(13, GPIO.HIGH)
    GPIO.output(3, GPIO.LOW)

    time.sleep(1)

    GPIO.output(3, GPIO.HIGH)
    GPIO.output(5, GPIO.LOW)

    time.sleep(1)

    GPIO.output(5, GPIO.HIGH)
    time.sleep(0.1)
    GPIO.output(5, GPIO.LOW)
    GPIO.output(3, GPIO.LOW)
    GPIO.output(13, GPIO.LOW)
    GPIO.output(11, GPIO.LOW)
    time.sleep(1)
    GPIO.output(5, GPIO.HIGH)
    GPIO.output(3, GPIO.HIGH)
    GPIO.output(13, GPIO.HIGH)
    GPIO.output(11, GPIO.HIGH)

    app = Flask(__name__)
    a = 'checked'
    @app.route('/',methods=['GET','POST'])
    def index():
    if request.method =='POST':
    GPIO.output(5, GPIO.LOW)
    time.sleep(0.001)
    GPIO.output(5, GPIO.HIGH)
    a = request.form["on2"]
    b = request.form["radio"]
    if b == 'one':
    if a == 'on':
    GPIO.output(11, GPIO.LOW)
    return render_template('led.html',i = 'ON',a = 'checked')
    else:
    GPIO.output(11, GPIO.HIGH)
    return render_template('led.html',i = 'OFF',a = 'checked')
    if b == 'two':
    if a == 'on':
    GPIO.output(13, GPIO.LOW)
    return render_template('led.html',j = 'ON',b = 'checked')
    else:
    GPIO.output(13, GPIO.HIGH)
    return render_template('led.html',j = 'OFF',b = 'checked')
    else:
    return render_template('led.html',w = 'please choose the botton!')
    else:
    GPIO.output(3, GPIO.LOW)
    time.sleep(0.1)
    GPIO.output(3, GPIO.HIGH)
    return render_template('led.html')

    if __name__ == "__main__":
    app.run(host='0.0.0.0', port=8888, debug=True)
1
2
3
4
5
6
7
8
9
10
11
12
13
14
15
16
17
18
19
20
21
22
23
24
25
26
27
28
29
30
31
32
33
34
35
36
37
38
39
40
41
42
43
44
45
46
<!DOCTYPE html PUBLIC "-//W3C//DTD XHTML 1.0 Transitional//EN" "http://www.w3.org/TR/xhtml1/DTD/xhtml1-transitional.dtd">
<html xmlns="http://www.w3.org/1999/xhtml">
<head>
<meta http-equiv="Content-Type" content="text/html; charset=utf-8" />
<title>led开关</title>
<link rel="shortcut icon" href="favicon.ico">
</head>
<style>
.aa{
fontcolor:FOO;
}
</style>

<body>
<center>
<h1>led控制</h1>
<h3>{{w}}</h3>
<form id="form1" name="form1" method="post" action="">

<p>
<input name="radio" type="radio" id="radio" value="one" {{a}}="{{a}}" />
<label for="radio"></label>
开关1   
<input type="radio" name="radio" id="radio" value="two" {{b}}="{{b}}" />
<label for="radio2"></label>
开关2
</p>
<p>状态:{{i}}     状态:{{j}}</p>
<p>
<input style="width:300px; height:75px; background-color: #0F0; font-size:24px; font-family:Verdana, Geneva, sans-serif; font-weight:bold; color:#FFF" type="submit" name="on2" id="on2" value="on" />
</p>
<p> </p>
<p>
<input style="width:300px; height:75px; background-color:#F00;font-size:24px; font-family:Verdana, Geneva, sans-serif; font-weight:bold; color:#FFF" type="submit" name="on2" id="on2" value="off" />
</p>
<p> </p>
<p> </p>
<p> </p>

<p> </p>
<p> </p>
<p>
</form>
</center>
</body>
</html>

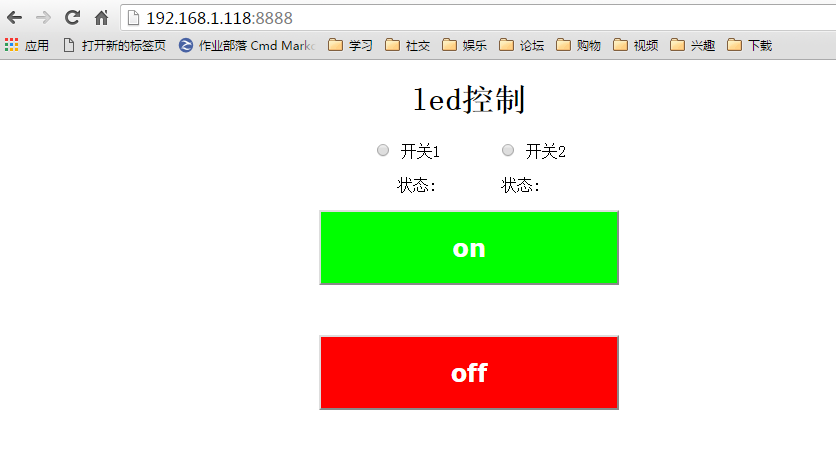
在同一局域网中的其他手机或电脑中输入树莓派的IP地址:8888,即可看到效果:
网页效果图

最后,选择开关1或者开关2,然后点击on或者off,即可看到LED灯会点亮或熄灭。

Git连接Coding.net远程仓库时无法push

发表于 2019-01-09 | 分类于 Git |
字数统计: 370 字 | 阅读时长 ≈ 1分钟

树莓派上安装了Git软件,在Coding.net上创建了版本库,然后clone下来:

1
pi@raspberrypi:~ $ git clone git@git.coding.net:username/projectname.git

成功clone下来,然后完成一次提交再push回去的时候却报错了,总结原因,写下我的折腾记录。。。

首先要生成ssh密钥,用命令$ ssh-keygen -t rsa -C "username@host.com"生成密钥,默认保存在/home/user/.ssh 目录下,包括id_rsa和id_rsa.pub两个文件,其中第一个是私钥,、第二个是公钥。
打开公钥,将所有内容复制,然后去coding.net的我的账户->SSH公钥,将复制的公钥内容粘贴进去,名称和有效日期按照自己的需求定义,最后点击添加。

然后再次push,还是报错,内容大致为:

1
2
Permission denied (publickey).
fatal: Could not read from remote repository.

于是继续百度……发现需要把专用密钥添加到ssh-agent的高速缓存中。该命令位置在/usr/bin/ssh-add。来自: http://man.linuxde.net/ssh-add
于是,执行上述命令,发现又报错了:

1
2
$ ssh-add ~/.ssh/rsa
Could not open a connection to your authentication agent.

继续搜索解决方案,最终按照以下方法解决了这个问题:
先执行

eval `ssh-agent` (是~键上面的那个`)

再执行 $ ssh-add ~/.ssh/rsa成功,最后 $ ssh-add -l 就可以看到新加的rsa了。
完成如上步骤,再次尝试$ git push,发现终于可以推送成功了~~~

解决树莓派软件源更新时公钥问题

发表于 2019-01-09 | 分类于 树莓派 |
字数统计: 430 字 | 阅读时长 ≈ 2分钟

标签: 树莓派 软件源 公钥


【参考链接】
如何更新Debian源和导入公钥
Ubuntu的软件源更新常见问题及解决

【问题说明】

在另一篇文章(树莓派安装KodExplorer变身私人云桌面)中,为了安装PHP7.0(通过软件仓库安装而不是编译安装),需要编辑文件sudo vim /etc/apt/sources.list,添加软件源:

1
deb http://mirrordirector.raspbian.org/raspbian/ stretch main contrib non-free rpi

结果添加了软件源之后进行sudo apt-get update的时候报错,错误信息大致如下:

W: GPG error: http://mirrordirector.raspbian.org/raspbian stretch InRelease: The following signatures couldn’t be verified because the public key is not available: NO_PUBKEY 9165938D90FDDD2E
W: The repository ‘http://mirrordirector.raspbian.org/raspbian stretch InRelease’ is not signed.
N: Data from such a repository can’t be authenticated and is therefore potentially dangerous to use.
N: See apt-secure(8) manpage for repository creation and user configuration details.
W: There is no public key available for the following key IDs:
9165938D90FDDD2E
E: Failed to fetch http://mirrordirector.raspbian.org/raspbian/dists/stretch/main/binary-armhf/Packages.xz Hash Sum mismatch
E: Some index files failed to download. They have been ignored, or old ones used instead.

错误信息大致意思为没有找到对应的公钥,所以软件源地址不被信任。

【解决方案】

解决方案就是导入对应仓库的公钥,命令格式为:

1
gpg --keyserver <KeyServer> --recv <公钥签名> gpg --export --armor <公钥签名> | sudo apt-key add

也可以用如下格式:

1
2
apt-key adv --keyserver <KeyServer> --recv-keys <公钥签名>
gpg --export --armor 40976EAF437D05B5 | sudo apt-key add -

其中:
<KeyServer>,key服务器,可以填 keyserver.ubuntu.com ,当然也可以填其他的。
在本例中,按照上面的格式,执行:

1
2
gpg --keyserver  keyserver.ubuntu.com --recv-keys 9165938D90FDDD2E
gpg --export --armor 9165938D90FDDD2E | sudo apt-key add -

然后再执行sudo apt-get update即可解决问题。

A Quick Guide to Using the MySQL APT Repository

发表于 2019-01-09 | 分类于 树莓派 |
字数统计: 5,542 字 | 阅读时长 ≈ 35分钟

标签: MySQL APT Repository


【来自:https://dev.mysql.com/doc/mysql-apt-repo-quick-guide/en/】

Abstract

This is a quick guide to using the MySQL APT repository, which provides deb packages for installing and managing the MySQL server, client, and other components on the following Linux platforms:

  • Debian 7.x (“Wheezy”)

  • Debian 8.x (“Jessie”)

  • Debian 9.x (“Stretch”)

  • Ubuntu 14.04 LTS (“Trusty Tahr”)

  • Ubuntu 16.04 (“Xenial Xerus”)

  • Ubuntu 17.04 (“Zesty Zapu”)

  • Ubuntu 17.10 (“Artful Aardvark”)

For legal information, see the Legal Notices.

For help with using MySQL, please visit either the MySQL Forums or MySQL Mailing Lists, where you can discuss your issues with other MySQL users.

For additional documentation on MySQL products, including translations of the documentation into other languages, and downloadable versions in variety of formats, including HTML and PDF formats, see the MySQL Documentation Library.

Document generated on: 2018-01-06 (revision: 55374)


Table of Contents


  1. Steps for a Fresh Installation of MySQL

  2. Selecting a Major Release Version

  3. Installing Additional MySQL Products and Components with APT

  4. Installing MySQL from Source with the MySQL APT Repository

  5. Upgrading MySQL with the MySQL APT Repository

  6. Replacing a Native Distribution of MySQL Using the MySQL APT Repository

  7. Replacing a MySQL Server Installed by a Direct deb Package Download

  8. Removing MySQL with APT

  9. Special Notes on Upgrading the Shared Client Libraries

  10. Installing MySQL NDB Cluster Using the APT Repository

  11. Installing Additional MySQL NDB Cluster Products and Components

  12. Available Packages from the MySQL APT Repository

  13. Appendix A: Adding and Configuring the MySQL APT Repository Manually

  14. Appendix B: Installing MySQL Non-interactively with MySQL APT Repository

  15. Appendix C: Errors with Missing Entries in the Repository Sources List

Steps for a Fresh Installation of MySQL

Note
The following instructions assume that no versions of MySQL (whether distributed by Oracle or other parties) have already been installed on your system; if that is not the case, follow the instructions given in Replacing a Native Distribution of MySQL Using the MySQL APT Repository or Replacing a MySQL Server Installed by a Direct deb Package Download instead.

1.Adding the MySQL APT Repository

First, add the MySQL APT repository to your system’s software repository list. Follow these steps:

  1. Go to the download page for the MySQL APT repository at http://dev.mysql.com/downloads/repo/apt/.

  2. Select and download the release package for your Linux distribution.

  3. Install the downloaded release package with the following command, replacing version-specific-package-name with the name of the downloaded package (preceded by its path, if you are not running the command inside the folder where the package is):

    1
    shell> sudo dpkg -i /PATH/version-specific-package-name.deb

For example, for version w.x.y-z of the package, the command is:

1
shell> sudo dpkg -i mysql-apt-config_w.x.y-z_all.deb

Note that the same package works on all supported Debian and Ubuntu platforms.

  1. During the installation of the package, you will be asked to choose the versions of the MySQL server and other components (for example, the MySQL Workbench) that you want to install. If you are not sure which version to choose, do not change the default options selected for you. You can also choose none if you do not want a particular component to be installed. After making the choices for all components, choose Ok to finish the configuration and installation of the release package.

You can always change your choices for the versions later; see Selecting a Major Release Version for instructions.

  1. Update package information from the MySQL APT repository with the following command (this step is mandatory):
    1
    shell> sudo apt-get update

Instead of using the release package, you can also add and configure the MySQL APT repository manually; see Appendix A: Adding and Configuring the MySQL APT Repository Manually for details.

Note
Once the MySQL APT repository is enabled on your system, you will no longer be able to install any MySQL packages from your platform’s native software repositories until the MySQL APT repository is disabled.

#2.Installing MySQL with APT
Install MySQL by the following command:

1
shell> sudo apt-get install mysql-server

This installs the package for the MySQL server, as well as the packages for the client and for the database common files.

During the installation, you are asked to supply a password for the root user for your MySQL installation.

Important
Make sure you remember the root password you set. Users who want to set a password later can leave the password field blank in the dialogue box and just press Ok; in that case, root access to the server will be authenticated by Socket Peer-Credential Pluggable Authentication for connections using a Unix socket file. You can set the root password later using the program mysql_secure_installation.

#3.Starting and Stopping the MySQL Server
The MySQL server is started automatically after installation. You can check the status of the MySQL server with the following command:

1
shell> sudo service mysql status

Stop the MySQL server with the following command:

1
shell> sudo service mysql stop

To restart the MySQL server, use the following command:

1
shell> sudo service mysql start

Note
A few third-party native repository packages that have dependencies on the native MySQL packages may not work with the MySQL APT repository packages and should not be used together with them; these include akonadi-backend-mysql, handlersocket-mysql-5.5, and zoneminder.

Selecting a Major Release Version
By default, all installations and upgrades for your MySQL server and the other required components come from the release series of the major version you have selected during the installation of the configuration package (see Adding the MySQL APT Repository). However, you can switch to another supported major release series at any time by reconfiguring the configuration package you have installed. Use the following command:

1
shell> sudo dpkg-reconfigure mysql-apt-config

A dialogue box then asks you to choose the major release version you want. Make your selection and choose Ok. After returning to the command prompt, update package information from the MySQL APT repository with this command:

1
shell> sudo apt-get update

The latest version in the selected series will then be installed when you use the apt-get install command next time.

You can use the same method to change the version for any other MySQL component you want to install with the MySQL APT repository.

Installing Additional MySQL Products and Components
You can use APT to install individual components of MySQL from the MySQL APT repository. Assuming you already have the MySQL APT repository on your system’s repository list (see Adding the MySQL APT Repository for instructions), first, use the following command to get the latest package information from the MySQL APT repository:

1
shell> sudo apt-get update

Install any packages of your choice with the following command, replacing package-name with name of the package (here is a list of available packages):

1
shell> sudo apt-get install package-name

For example, to install the MySQL Workbench:

1
shell> sudo apt-get install mysql-workbench-community

To install the shared client libraries:

1
shell> sudo apt-get install libmysqlclient18

Installing MySQL from Source with the MySQL APT Repository

Note
This feature is only supported on 64-bit systems.

You can download the source code for MySQL and build it using the MySQL APT Repository:

  1. Add the MySQL APT repository to your system’s repository list and choose the major release series you want (see Adding the MySQL APT Repository for instructions).

  2. Update package information from the MySQL APT repository with the following command (this step is mandatory):

    1
    shell> sudo apt-get update
  3. Install packages that the build process depends on:

    1
    shell> sudo apt-get build-dep mysql-server
  4. Download the source code for the major components of MySQL and then build them (run this command in the folder in which you want the downloaded files and the builds to be located):

    1
    shell> apt-get source -b mysql-server

deb packages for installing the various MySQL components are created.

  1. Pick the deb packages for the MySQL components you need and install them with the command:
    1
    shell> sudo dpkg -i package-name.deb

Notice that dependency relationships exist among the MySQL packages. For a basic installation of the MySQL server, install the database common files package, the client package, the client metapackage, the server package, and the server metapackage (in that order) with the following steps:

  • Preconfigure the MySQL server package with the following command:
    1
    shell> sudo dpkg-preconfigure mysql-community-server_version-and-platform-specific-part.deb

You will be asked to provide a password for the root user for your MySQL installation; see important information on root password given in Installing MySQL with APT above. You might also be asked other questions regarding the installation.

  • Install the required packages with a single command:

    1
    shell> sudo dpkg -i mysql-{common,community-client,client,community-server,server}_*.deb
  • If you are being warned of unmet dependencies by dpkg, you can fix them using apt-get:

    1
    sudo apt-get -f install

Here are where the files are installed on the system:

  • All configuration files (like my.cnf) are under /etc/mysql

  • All binaries, libraries, headers, etc., are under /usr/bin and /usr/sbin

  • The data directory is under /var/lib/mysql

See also information given in Starting and Stopping the MySQL Server.

Upgrading MySQL with the MySQL APT Repository

Notes

  • Before performing any upgrade to MySQL, follow carefully the instructions in Upgrading MySQL. Among other instructions discussed there, it is especially important to back up your database before the upgrade.
  • The following instructions assume that MySQL has been installed on your system using the MySQL APT repository; if that is not the case, follow the instructions given in Replacing a Native Distribution of MySQL Using the MySQL APT Repository or Replacing a MySQL Server Installed by a Direct deb Package Download instead. Also notice that you cannot use the MySQL APT repository to upgrade a distribution of MySQL that you have installed from a nonnative software repository (for example, from MariaDB or Percona).

Use the MySQL APT repository to perform an in-place upgrade for your MySQL installation (that is, replacing the old version and then running the new version off the old data files) by following these steps:

  1. Make sure you already have the MySQL APT repository on your system’s repository list (see Adding the MySQL APT Repository for instructions).

  2. Make sure you have the most up-to-date package information on the MySQL APT repository by running:

    1
    shell> sudo apt-get update
  3. Note that, by default, the MySQL APT repository will update MySQL to the release series you have selected when you were adding the MySQL APT repository to your system. If you want to upgrade to another release series, select it by following the steps given in Selecting a Major Release Version.

As a general rule, to upgrade from one release series to another, go to the next series rather than skipping a series. For example, if you are currently running MySQL 5.5 and wish to upgrade to a newer series, upgrade to MySQL 5.6 first before upgrading to 5.7, and so on.

Important

  • For important information about upgrading from MySQL 5.5 to 5.6, see Upgrading from MySQL 5.5 to 5.6.
  • For important information about upgrading from MySQL 5.6 to 5.7, see Upgrading from MySQL 5.6 to 5.7.
  • For important information about upgrading from MySQL 5.7 to 8.0, see Upgrading from MySQL 5.7 to 8.0.
  • In-place downgrading of MySQL is not supported by the MySQL APT repository. Follow the instructions in Downgrading MySQL.
  1. Upgrade MySQL by the following command:
    1
    shell> sudo apt-get install mysql-server

The MySQL server, client, and the database common files are upgraded if newer versions are available. To upgrade any other MySQL package, use the same apt-get install command and supply the name for the package you want to upgrade:

1
shell> sudo apt-get install package-name

To see the names of the packages you have installed from the MySQL APT repository, use the following command:

1
shell> dpkg -l | grep mysql | grep ii

Note
If you perform a system-wide upgrade by the apt-get upgrade, only the library and development packages for MySQL will get upgraded with newer versions (if available). To upgrade other components including the server, client, test suite, etc., use the apt-get install command, as explained precedingly.

  1. The MySQL server always restarts after an update by APT. Once the server restarts, you should run mysql_upgrade to check and possibly resolve any incompatibilities between the old data and the upgraded software. mysql_upgrade also performs other functions; see mysql_upgrade — Check and Upgrade MySQL Tables for details.

Replacing a Native Distribution of MySQL Using the MySQL APT Repository
Variants and forks of MySQL are distributed by different parties through their own software repositories or download sites. You can replace a native distribution of MySQL installed from your Linux platform’s software repository with a distribution from the MySQL APT repository in a few steps.

Note
The MySQL APT repository can only replace distributions of MySQL maintained and distributed by Debian or Ubuntu. It cannot replace any MySQL forks found either inside or outside of the distributions’ native repositories. To replace such MySQL forks, you have to uninstall them first before you install MySQL using the MySQL APT repository. Follow the instructions for uninstallation from the forks’ distributors and, before you proceed, make sure you back up your data and you know how to restore them to a new server.

Warning
A few third-party native repository packages that have dependencies on the native MySQL packages may not work with the MySQL APT repository packages and should not be used together with them; these include akonadi-backend-mysql, handlersocket-mysql-5.5, and zoneminder.

1.Backing Up Your Database
To avoid loss of data, always back up your database before trying to replace your MySQL installation using the MySQL APT repository. See Backup and Recovery for instructions.

2.Adding the MySQL APT Repository and Selecting a Release Series
Add the MySQL APT repository to your system’s repository list and select the release series you want by following the instructions given in Adding the MySQL APT Repository.

3.Replacing the Native Distribution by an APT Update
By design, the MySQL APT repository replaces your native distribution of MySQL when you perform upgrades on the MySQL packages. To perform the upgrades, follow the same instructions given in Step 4 in Upgrading MySQL with the MySQL APT Repository.

Warning
Once the native distribution of MySQL has been replaced using the MySQL APT repository, purging the old MySQL packages from the native repository using the apt-get purge, apt-get remove –purge, or dpkg -P command might impact the newly installed MySQL server in various ways. Therefore, do not purge the old MySQL packages from the native repository packages.

Replacing a MySQL Server Installed by a Direct deb Package Download
deb packages from MySQL for installing the MySQL server and its components can either be downloaded from the MySQL Developer Zone’s MySQL Download page or from the MySQL APT repository. The deb packages from the two sources are different, and they install and configure MySQL in different ways.

If you have installed MySQL with the MySQL Developer Zone’s deb packages and now want to replace the installation using the ones from the MySQL APT repository, follow these steps:

Back up your database. See Backup and Recovery for instructions.

Follow the steps given previously for adding the MySQL APT repository.

Remove the old installation of MySQL by running:

shell> sudo dpkg -P mysql
Install MySQL from the MySQL APT repository:

shell> sudo apt-get install mysql-server
If needed, restore the data on the new MySQL installation. See Backup and Recovery for instructions.

Removing MySQL with APT
To uninstall the MySQL server and the related components that have been installed using the MySQL APT repository, first, remove the MySQL server using the following command:

shell> sudo apt-get remove mysql-server
Then, remove any other software that was installed automatically with the MySQL server:

shell> sudo apt-get autoremove
To uninstall other components, use the following command, replacing package-name with the name of the package of the component you want to remove:

shell> sudo apt-get remove package-name
To see a list of packages you have installed from the MySQL APT repository, use the following command:

shell> dpkg -l | grep mysql | grep ii
Special Notes on Upgrading the Shared Client Libraries
You can install the shared client libraries from MySQL APT repository by the following command (see Installing Additional MySQL Products and Components with APT for more details):

shell> sudo apt-get install libmysqlclient20
If you already have the shared client libraries installed from you Linux platform’s software repository, it can be updated by the MySQL APT repository with its own package by using the same command (see Replacing the Native Distribution by an APT Update for more details).

After updating MySQL using the APT repository, applications compiled with older versions of the shared client libraries should continue to work.

If you recompile applications and dynamically link them with the updated libraries: as typical with new versions of shared libraries, any applications compiled using the updated, newer shared libraries might require those updated libraries on systems where the applications are deployed. If those libraries are not in place, the applications requiring the shared libraries might fail. Therefore, it is recommended that the packages for the shared libraries from MySQL be deployed on those systems. You can do this by adding the MySQL APT repository to the systems (see Adding the MySQL APT Repository) and installing the latest shared client libraries using the command given at the beginning of this section.

Installing MySQL NDB Cluster Using the APT Repository
Notes
The MySQL APT repository supports installation of MySQL NDB Cluster only for release 7.5.6 and later, and only for Debian 7.x and 8.x, and Ubuntu 14.04 and 16.04. For other methods of installing NDB Cluster, see Installation of NDB Cluster on Linux, or Installation of NDB Cluster on Linux, depending on the release series that you are using.

If you already have the MySQL server or MySQL NDB Cluster installed on your system, make sure it is stopped and you have your data and configuration files backed up before proceeding.

Known issues: The MySQL NDB Cluster packages have dependencies on the python-paramiko and libclass-methodmaker-perl packages, which are currently NOT installed automatically when you install the NDB Cluster packages; install those required packages yourself with this command before installing the NDB Cluster packages:

shell> sudo apt-get install python-paramiko libclass-methodmaker-perl
Adding the MySQL APT Repository for MySQL NDB Cluster
Follow the steps in Adding the MySQL APT Repository to add the MySQL APT repository to your system’s repository list. During the installation process of the configuration package, when you are asked which MySQL product you want to configure, choose “MySQL Server & Cluster”; when asked which version you wish to receive, choose “mysql-cluster-x.y.” After returning to the command prompt, go to Step 2 below.

If you already have the configuration package installed on your system, make sure it is up-to-date by running the following command:

shell> sudo apt-get install mysql-apt-config
Then, use the same method described in Selecting a Major Release Version to select MySQL NDB Cluster for installation. When you are asked which MySQL product you want to configure, choose “MySQL Server & Cluster”; when asked which version you wish to receive, choose “mysql-cluster-x.y.” After returning to the command prompt, update package information from the MySQL APT repository with this command:

shell> sudo apt-get update
Installing MySQL NDB Cluster
For a minimal installation of MySQL NDB Cluster, follow these steps:

Install the components for SQL nodes:

shell> sudo apt-get install mysql-cluster-community-server
You will be asked to provide a password for the root user for your SQL node; see important information on the root password given in Installing MySQL with APT above. You might also be asked other questions regarding the installation.

Install the executables for management nodes:

shell> sudo apt-get install mysql-cluster-community-management-server
Install the executables for data nodes:

shell> sudo apt-get install mysql-cluster-community-data-node
Configuring and Starting MySQL NDB Cluster
See Initial Configuration of NDB Cluster on how to configure MySQL NDB Cluster and Initial Startup of NDB Cluster on how to start it for the first time. When following those instructions, adjust them according to the following details regarding the SQL nodes of your NDB Cluster installation:

All configuration files (like my.cnf) are under /etc/mysql

All binaries, libraries, headers, etc., are under /usr/bin and /usr/sbin

The data directory is /var/lib/mysql

Installing Additional MySQL NDB Cluster Products and Components
You can use APT to install individual components and additional products of MySQL NDB Cluster from the MySQL APT repository (see Available Packages from the MySQL APT Repository for a list). To do that, assuming you already have the MySQL APT repository on your system’s repository list (see Adding the MySQL Yum Repository for MySQL NDB Cluster), follow the same steps given in Installing Additional MySQL Products and Components with APT.

Note
Known issue: Currently, not all components required for running the MySQL NDB Cluster test suite are installed automatically when you install the test suite package (mysql-cluster-community-test). Install the following packages with apt-get install before you run the test suite:

mysql-cluster-community-auto-installer

mysql-cluster-community-management-server

mysql-cluster-community-data-node

mysql-cluster-community-memcached

mysql-cluster-community-java

ndbclient-dev

Available Packages from the MySQL APT Repository
Table 1 Available Packages from the MySQL APT Repository

Package Name Description
mysql-server

Metapackage for installing the MySQL server

mysql-community-server

MySQL server

mysql-client

Metapackage for installing the MySQL client

mysql-cluster-community-auto-installer

Auto installer for NDB Cluster

mysql-cluster-community-client

MySQL client for NDB Cluster

mysql-cluster-community-data-node

NDB Cluster data node

mysql-cluster-community-java

NDB Cluster Java drivers

mysql-cluster-community-management-server

NDB Cluster management node

mysql-cluster-community-memcached

NDB Cluster memcached server

mysql-cluster-community-server

MySQL server for NDB Cluster

mysql-cluster-community-source

Source package for NDB Cluster

mysql-cluster-community-test

NDB Cluster testsuite

mysql-community-client

MySQL client

mysql-common

MySQL database common files

libmysqlclient20

MySQL database client library

libmysqlclient-dev

MySQL database development files

libmysqld-dev

MySQL embedded database development files

mysql-testsuite

Metapackage for installing the MySQL test suite

mysql-community-test

MySQL test suite

mysql-community-bench

MySQL benchmark suite

mysql-community-source

MySQL source code

mysql-workbench-community
MySQL Workbench (not available for Debian platforms)

mysql-connector-python-py3
MySQL Connector/Python for Ubuntu 14.04, 14.10, and 15.04 with Python 3.2 or later

mysql-connector-python
MySQL Connector/Python for Debian 7.x or Debian 8.x with Python 2.6.3 or later, and for Ubuntu 14.04, 14.10, or 15.04 with Python 2.6.3 to 3.1

mysql-utilities MySQL Utilities (currently not available for Debian 8.x)
mysql-router MySQL Router
ndbclient NDB Cluster client
ndbclient-dev NDB Cluster client development library

Appendix A: Adding and Configuring the MySQL APT Repository Manually
Here are the steps for adding manually the MySQL APT repository to your system’s software repository list and configuring it, without using the release packages provided by MySQL:

Download the MySQL GPG Public key (see Signature Checking Using GnuPG on how to do that) and save it to a file, without adding any spaces or special characters. Then, add the key to your system’s GPG keyring with the following command:

shell> sudo apt-key add path/to/signature-file
Alternatively, you can download the GPG key to your APT keyring directly using the apt-key utility:

shell> sudo apt-key adv –keyserver pgp.mit.edu –recv-keys 5072E1F5
Create a file named /etc/apt/sources.list.d/mysql.list, and put into it repository entries in the following format:

deb http://repo.mysql.com/apt/{debian|ubuntu}/ {jessie|wheezy|trusty|utopic|vivid} {mysql-5.6|mysql-5.7|workbench-6.2|utilities-1.4|connector-python-2.0}
Pick the relevant options for your repository set up:

Choose “debian” or “ubuntu” according to whether you are on a Debian or Ubuntu platform.

Choose “jessie,” “ wheezy,” “trusty,” “utopic,” or “vivid,” according to the version of your operating system.

For installing MySQL server, client, and database common files, choose “mysql-5.6” or “mysql-5.7” according to the MySQL version you want. To switch to another release series later, come back and adjust the entry with your new choice.

Note
If you already have a version of MySQL installed on your system, do not choose a lower version at this step, or it might result in an unsupported downgrade operation.

For installing components like MySQL Workbench, MySQL Utilities, or MySQL Connector Python, create a single entry for each of them, specifying respectively “workbench-6.2,” “utilities-1.4,” or “connector-python-2.0” at the end of each entry.

As an example, for a Ubuntu 14.04 platform, here are the lines in your mysql.list files for installing MySQL 5.6 and MySQL Connector/Python from the MySQL APT repository:

deb http://repo.mysql.com/apt/ubuntu/ trusty mysql-5.6
deb http://repo.mysql.com/apt/ubuntu/ trusty connector-python-2.0
Use the following command to get the most up-to-date package information from the MySQL APT repository:

shell> sudo apt-get update
You have configured your system to use the MySQL APT repository and are now ready to continue with Installing MySQL with APT or Installing Additional MySQL Products and Components with APT.

Appendix B: Installing MySQL Non-interactively with MySQL APT Repository
For non-interactive installations of MySQL with the MySQL APT repository, answer the interactive questions asked by the server package by setting the relevant debconf variables in, for example, your installation script. These are the variables to set:

root_password: This is the root password for the server installation.

root_password_again: This is the root password, entered a second time for confirmation.

The following are steps from a sample script that set the debconf variables and then install MySQL non-interactively by setting the environment variable DEBIAN_FRONTEND to noninteractive:

sudo debconf-set-selections <<< “mysql-community-server mysql-community-server/root-pass password mypassword”
sudo debconf-set-selections <<< “mysql-community-server mysql-community-server/re-root-pass password mypassword”
sudo DEBIAN_FRONTEND=noninteractive apt-get -y install mysql-server
The password variables are erased automatically after MySQL has been installed, so they need to be set again if the installation is to be repeated.

Appendix C: Errors with Missing Entries in the Repository Sources List
Users who configured their systems some time ago with an early and now outdated version of the release package for the MySQL APT repository might see a warning similar to the one below when running the apt-get update command:

shell> sudo apt-get update
W: Failed to fetch http://repo.mysql.com/apt/ubuntu/dists/trusty/InRelease
Unable to find expected entry ‘utilities-1.4/binary-amd64/Packages’ in
Release file (Wrong sources.list entry or malformed file)
The apt-get update command fails with this, and it is no longer possible to update package information for the MySQL APT repository. This is due to outdated entries in the sources list, and you can resolve the problem by the following steps:

Delete the file /etc/apt/sources.list.d/mysql.list from your system. That removes all sources list entries for the MySQL APT repository.

Download and install the latest version of the release package for the MySQL repository by following the steps given in Adding the MySQL APT Repository, including the sudo apt-get update step. It reconfigures your system properly for using the MySQL APT repository.

Legal Notices
Copyright © 1997, 2018, Oracle and/or its affiliates. All rights reserved.

This software and related documentation are provided under a license agreement containing restrictions on use and disclosure and are protected by intellectual property laws. Except as expressly permitted in your license agreement or allowed by law, you may not use, copy, reproduce, translate, broadcast, modify, license, transmit, distribute, exhibit, perform, publish, or display any part, in any form, or by any means. Reverse engineering, disassembly, or decompilation of this software, unless required by law for interoperability, is prohibited.

The information contained herein is subject to change without notice and is not warranted to be error-free. If you find any errors, please report them to us in writing.

If this is software or related documentation that is delivered to the U.S. Government or anyone licensing it on behalf of the U.S. Government, then the following notice is applicable:

U.S. GOVERNMENT END USERS: Oracle programs, including any operating system, integrated software, any programs installed on the hardware, and/or documentation, delivered to U.S. Government end users are “commercial computer software” pursuant to the applicable Federal Acquisition Regulation and agency-specific supplemental regulations. As such, use, duplication, disclosure, modification, and adaptation of the programs, including any operating system, integrated software, any programs installed on the hardware, and/or documentation, shall be subject to license terms and license restrictions applicable to the programs. No other rights are granted to the U.S. Government.

This software or hardware is developed for general use in a variety of information management applications. It is not developed or intended for use in any inherently dangerous applications, including applications that may create a risk of personal injury. If you use this software or hardware in dangerous applications, then you shall be responsible to take all appropriate fail-safe, backup, redundancy, and other measures to ensure its safe use. Oracle Corporation and its affiliates disclaim any liability for any damages caused by use of this software or hardware in dangerous applications.

Oracle and Java are registered trademarks of Oracle and/or its affiliates. Other names may be trademarks of their respective owners.

Intel and Intel Xeon are trademarks or registered trademarks of Intel Corporation. All SPARC trademarks are used under license and are trademarks or registered trademarks of SPARC International, Inc. AMD, Opteron, the AMD logo, and the AMD Opteron logo are trademarks or registered trademarks of Advanced Micro Devices. UNIX is a registered trademark of The Open Group.

This software or hardware and documentation may provide access to or information about content, products, and services from third parties. Oracle Corporation and its affiliates are not responsible for and expressly disclaim all warranties of any kind with respect to third-party content, products, and services unless otherwise set forth in an applicable agreement between you and Oracle. Oracle Corporation and its affiliates will not be responsible for any loss, costs, or damages incurred due to your access to or use of third-party content, products, or services, except as set forth in an applicable agreement between you and Oracle.

This documentation is NOT distributed under a GPL license. Use of this documentation is subject to the following terms:

You may create a printed copy of this documentation solely for your own personal use. Conversion to other formats is allowed as long as the actual content is not altered or edited in any way. You shall not publish or distribute this documentation in any form or on any media, except if you distribute the documentation in a manner similar to how Oracle disseminates it (that is, electronically for download on a Web site with the software) or on a CD-ROM or similar medium, provided however that the documentation is disseminated together with the software on the same medium. Any other use, such as any dissemination of printed copies or use of this documentation, in whole or in part, in another publication, requires the prior written consent from an authorized representative of Oracle. Oracle and/or its affiliates reserve any and all rights to this documentation not expressly granted above.

Documentation Accessibility
For information about Oracle’s commitment to accessibility, visit the Oracle Accessibility Program website at http://www.oracle.com/pls/topic/lookup?ctx=acc&id=docacc.

Access to Oracle Support
Oracle customers that have purchased support have access to electronic support through My Oracle Support. For information, visit http://www.oracle.com/pls/topic/lookup?ctx=acc&id=info or visit http://www.oracle.com/pls/topic/lookup?ctx=acc&id=trs if you are hearing impaired.

[37ml#repo-qg-apt-replace-direct

1234
Fy.L

Fy.L

你若赐我一段浮华,我便许你满世繁花

38 日志
11 分类
36 标签
RSS
GitHub
© 2019 Fy.L
由 Hexo 强力驱动
|
主题 — NexT.Gemini v5.1.4